Saturday, 12 April 2014

Komodo Dragon Animation


Above is the animation I did for the Komodo dragon, if you couldn't tell it's just opening it's mouth to devour something...

Making of the animation;
I moved the model from Mudbox by obj format again and I exported normal maps out, you can see below what I clicked on to extract the maps.
[Image]
After a lot of trial and error I learnt that since I added the claws and eyes in Mudbox, it kept messing the UVs up when I render the maps and they weren't being projected properly onto the model.

After getting the maps rendered and working I used a blinn material, then I clicked onto bump mapping and then chose file and selected the normal maps that I rendered earlier in PSD format. This made the model have the same amount of detail, it doesn't actually change the geometry it's just a stimulation of sorts, that makes the surface look dynamic and 3D. I also had the paint maps from mudbox and since the model has UV it all just fit perfectly on the blinn material.

After getting that set-up all I had to do was add the bones, I used the join tool to add 4 joints; 2 at the bottom, 1 in the neck and 1 in on the top of the mouth, I used this placement after trail and error and looking at the mood board. Then I just went under skin and clicked on smooth bind. This just made it more natural.
then I created an IK handle for the joints and basically set a key frame at the beginning and moved the slider and changed the IK handle position and set another key frame then moved the IK handle back to the original place and created another key frame.

Thursday, 10 April 2014

3D renders after mudbox


Mudbox Detailing

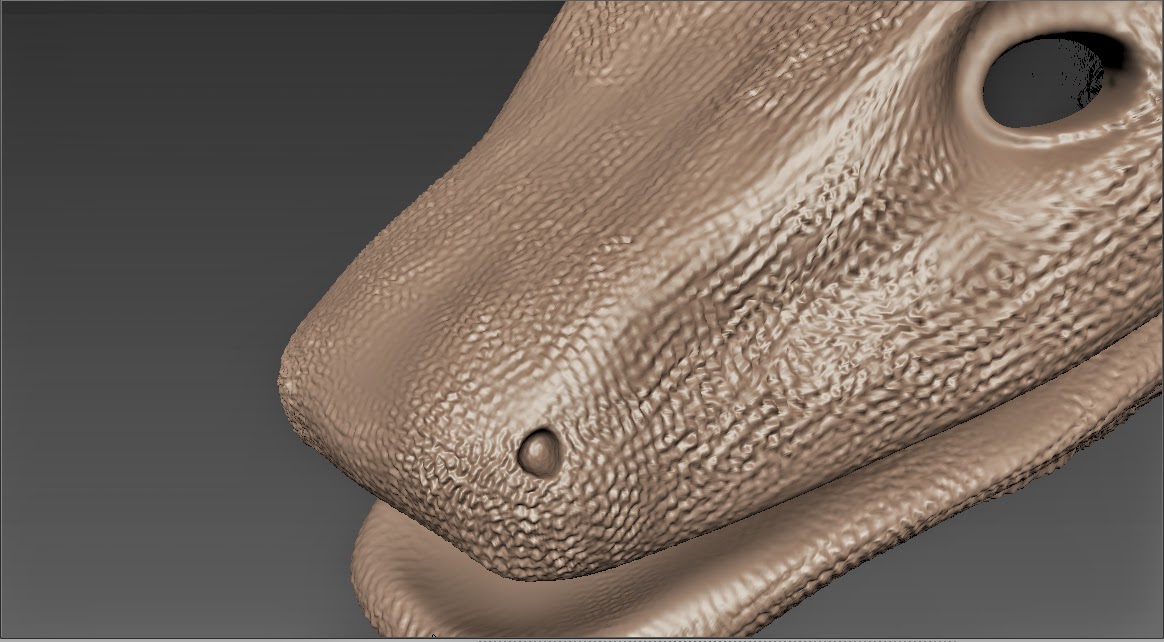
 I imported the model from Maya to Mudbox via obj format, and I went onto pixel logic's website to download dragon scale alphas which I'll use as a stamp and stencil. After finding an alpha that resembles the scales of the Komodo dragon I got to adding the detail with the sculpt brush and repeat brush, I started of with the hear, I looked at my reference images to see where the scales were densely packed. Different Komodo dragons had different scale density so I choose to place the scales according to one of the images.
I shaped up the fingers and the the feet for the nails to be placed and I used the foamy brush for this with crtl key held down to push the geometry back. Also I added bigger scales compared to the face because that's what I saw in the reference images. I flattened the edge of the fingers so you could plant the nails in and then bring the mesh out and over the nails.
Then I used the foamy brush to add the wrinkles around the neck and the legs, also in my reference images I could see that the mouth sack also has wrinkles. I also noticed that one of the wrinkles ran across the body and it kinda of defined the softer skin underneath the stomach.
In the picture above you can see the where the wrinkles are under the skin, I could have added more wrinkles to it but I didn't because in the reference images I can see that whe the komodo moves the wrinkles shift around.
I added the eyes next and the nails; I did this in mudbox since I didn't really have the time to take it back, to maya and start the process again. I took the model into maya and then placed the eye balls and the nails in the proper position and then deleted the mesh for the model, then I moved the eyes and the nails from Maya by exporting as obj; which then got imported and shaped up properly by adding more subdivisions and making them concave.
I then decided to paint the dragon in Mudbox, So I selected the paint brush and created a tiff layer and started paint, can't really say much about this process other than I kept chaning colours until I saw something suitable and I painted a lighter tone on the stomach.

Monday, 31 March 2014

UV mapping

Again I'll be doing the planner mapping and I'll only do it for one side for the sake of quicker workflow but I have to make sure that players are not able to tell that the the UV map is copied over to the other side. I used the setting above for planner mapping.

Here is an image of the selected edge loops; this is where the cuts will go and I'll unfold. Again The results weren't looking like something that can be edited in Photoshop, So I made another edge selection around the neck so the head will be bigger in the UV texture editor. and I made separate planner mapping for the feet.

The feet look good but I couldn't unfold them using options in the UV editor so I'll have to do it manually, which will take longer but the results will be perfect.
The final result of UV mapping is above, They are way better than before, because I don't have unnecessary geometry on the model, all the errors with the mesh are fixed such as the non-planner faces, faces with more than 4 edges and typology is now all in quads.
Then All I did was mirror geometry and now the UVs are overlap so when I paint one side, it will copy it to the other side.

Thursday, 27 March 2014

Fixing mesh

I was going to define the details on the claws in Zbrush or Mudbox but then I thought I should at least get the basic shape done in Maya so it's easier when I export it to Mudbox.
Then I ran the 'cleanup', I told it to highlight faces so I could go in and fix them myself instead of getting weird cuts. I had to fix the claws they had faces with more than 4 sides.I then subdivided the mesh and got it ready for export but before that I ran a 'cleanup' again and told it to fix various mesh related problems such as concave faces, non-planner faces and the result is below.

If you look carefully you'll see that near one of the legs the faces are cut weirdly and it just doesn't look right, To fix that I tried deleting the whole edge and firstly, it wouldn't let me select the whole edge so I had to manually go over each of the edge lines and select them, secondly after deleting it i had to insert a edge loop where theses ziz-zags were but then I had to delete all the faces that were connected to that edge cause it wasn't clean. After deleting them I had to use the merge vertex tool to connect them all. Then I ran another clean up and and took it to Mudbox, but here I kept running into the 't-shape' error so I had to go back to Maya and fix some faces. The feet/claws were looking messy and so I tried cleaning the area up but that wasn't really possible, after a lot of attempts at finding the errors I realized that there was no need to subdivide before I took it to Mudbox because I could always do that later. I knew something like this would happen this is why I had multiple saves so I could revert back to any stage of the modeling process. I found a save where the model didn't have feet and wasn't subdivide, and I started working on the feet, this time after seeing a demonstration on how to make clean extrusions of the faces on the feet to make fingers; I was able to get cleaner geometry around the claws/feet and you can see that below.
Also cleaned up all the mess near the opening of the mouth and deleted a lot of unnecessary geometry all around the model. Finally it was time to UV map the whole model.

Thursday, 20 March 2014

UV Map (before the mesh fix post)

In the picture you can see the edges where I'll make the UV cuts and unfold at. For this model I'll be using Planner mapping, this can be found under 'Create UV's'. (note this is before the mesh fixing in the next post).

After unfolding, I see the mess above, some parts like the claws are barely visible, that isn't a problem because we can always scale, upon further inspections I discovered the following problems; The head is way too small and there is some kind of error near the nostrils, the feet doesn't seem right, and the typology seems messed up as well.

Clearly this isn't going to work... I have to fix the model before I mess with this.

Tuesday, 18 March 2014

360 view

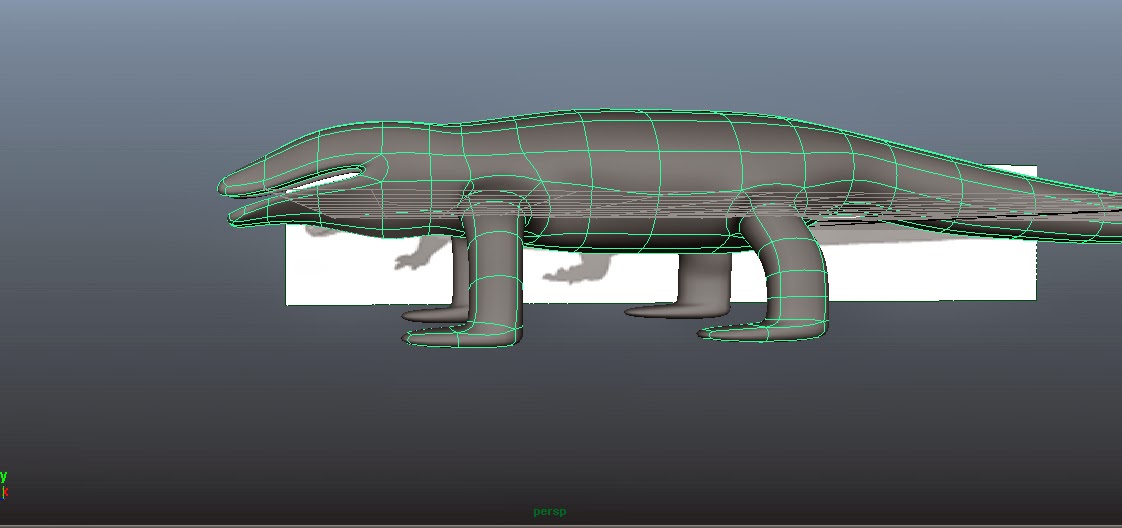
Currently this is what the model looks like, I'll probably make a lot more adjustments before I move onto adding the detail.

modeling 1

-Box modelling
The method of modelling I use is called box modelling, I'll make another post explaining what box modelling is.

- Multiple saves
When modelling it's easy to mess up and either ruin the model or just lose it, so it's recommended that you have multiple saves, not only does it allow you to revert back at any time, it also lets you see your progress, I have around 20 saves for this model, I remembered to make a new save every time I made a major change.

- Reference images
 I kept the reference images opened in photoshop, so I could zoom and view detail that exists in real life and then try to replicate that to the model. Since I'm box modelling I have a side view of the komodo dragon on the side view port and komodo dragon facing towards the camera, on the front view. this is usually more than enough but I have another image on the top view port which when viewed in the prospective view, is below the model.

- Custom tool bar
 I added shortcuts to the custom tab so I wouldn't have to keep clicking the 'edit mesh' and then click what you will use over and over

- Clean model
I made sure to keep the model clean and low poly to begin with because it's easier to model when you don't have to transform and edit a lot of polygons. From my previous project which was about making a tower in Autodesk maya, I learnt that I should work with quads and should try to keep the typology neat and tidy to avoid in faces and errors at bay.

- Special mirror/ copy on model
I only modelled one side because within the time I'm given I wanted to make sure I get a decent model done, by modelling half of the model I can mirror the geometry later. After I created the cylinder I selected on half of the cylinder and deleted it then I went and clicked on duplicate special, I then double clicked the move tool and enabled soft selection and reflection; I had to mess with the parameters to get the settings I want but in the end I did all this so I only have to model one half of the model but I can see what the final result will look like because whatever I do on one side gets copied to the other side. I enabled soft selection because it's like photoshop brush hardness, and this moves more polygons; soft selection allows for a natural look without having to move a lot of the polygon individually

To start off I created a cylinder because it matches the body shape of a komodo dragon pretty closely, I could have started off with pretty much anything but the best poly shapes to use when starting off modelling something like a reptile, cube or cylinder is recommended.

Above you can see most of the shortcuts that I plan to use on this model, first icon is extrude, which is essential and I think I've used it the most. Second icon is to connect/merge vertices's. Third icon is for creating faces or 'bridges'. Forth icon is probably to merge edges or something to do with edges. Final icon is for 'insert edge loop tool, it allows you add a loop that goes around and basically can be done on most faces.


 You can add more segments if you want but I chose not to because I like to add them as I go along. more segments means I'll have to move more polygons around before I even get the basic shape of the komodo dragon.

 In this image you can see I'm using the reference image to move vertices to the designated place, so now the shape resembles the image and is now one step closer to becoming a komodo dragon.


I held right click on the model to get the options menu and then clicked on edge, then I when and double clicked onto he back of the cylinder, double clicking allows you to select the whole edge in this case it selected the whole circle at the edge then I clicked on my shortcut; extrude. Then I clicked on the key 'w' which is a shortcut for the move tool and just dragged a bit and positioned it where it needed to go and then I clicked on extrude again and I moved it again and again, scaling the loop that was highlighted in order to form the slim bit at the edge.

Here made the front and the back of the model more like the komodo dragon; making the face and the tail less wide and flat.
In the image above you can see I'm using all of the view ports to align the polygons and model it to the reference images. So far I haven't ran into problems which is a good thing, because I want to make the low poly model as quick as possible because later on I'll have to add detail with other programs which will take longer than this (maybe won't really know until I start doing it).
I then went onto making the stomach more wider and rounder, I used the top view to do this because I found a really good image that had a little exaggerated stomach. Also I fixed the head and made it more reptile like, resembles a dinosaur from the top.
Then I went onto making the legs and the claws, first I'll say that for whatever reason this took way too long, probably because it's my first time model a creature like this in Maya but still; took longer and I wasn't really happy with the results and you'll see later on that I modify the legs and claws later on. The process I used to make the legs was basic. I deleted a face near the stomach (using the reference images) and used the edge tool to select a loop which I then extruded and moved down but I increased the 'division' option so that this leg was somewhat smooth.
I did the same thing for the back leg however it went quicker than the previous attempt because I had learnt exactly what I needed to do.
I then started to work in subdivision mode which can be activated by pressing the number '3' on the keyboard, this makes everything look smoother as you can see in the image above, this is no longer 'blocky'. Just after turning on subdivision mode I made the neck kind of thicker and more slouchy, I did this because I saw some images of the komodo dragon on the mood board; where it had a massive saggy pouch under the neck which will let it devour prey.
(This part is harder to explain without actually showing you what I'm doing). After that I made the mouth; I wanted to give it more depth so I selected the rim with the edge tool and again used extrude. and I typed '0' in the 'X' position at the top near options for polygons and such, this meant that I wouldn't have to manually move the extruded part myself and it wouldn't overlap the other side. After doing that I when in the vertex mode and used 'merge vertex tool' to connect the faces together. The result is perfect for what this model will do in-game.  

Then I started to work on the eye sockets, by selecting the face where I want the eye to go and using extrude. This next bit took trail and error, where I basically did it over and over until I got something close enough to what the eyes look like.
Finally I deleted the left side of the model because it is now time to connect the geometry, I then clicked on mirror geometry under the mesh option, then I selected '-x' bexause that's where I want it to be mirrored and I made sure that merge vertices was selected and merge with orignal. This conncect the geometry and I was now going to make some finally tweaks.

Monday, 17 March 2014

Concept art for Komodo dragon

Here I sketched different poses of the komodo dragon, eating, opening it's mouth and idle pose as well.

Friday, 14 March 2014

Mood board for Komodo dragon

This is a mood board for the komodo dragon, I had to get different images, from real life, drawings and illliustions so when it's easier when I have to make the model in Autodesk maya and Zbrush. I also got some images of the claws and the tail because I know I'll need good reference when I'm making the model.

Friday, 28 February 2014

change of plan

As I was finishing the concept art for the wolf and started planning of the model in Autodesk Maya, we had another meeting, In this meeting we had to decide and fine tune a lot of things such as the story and the environment. Our story didn't make sense and there were a lot of plot holes, so everyone worked on fixing these and this lead to chaining of the environment which meant that wolves would no longer be used since we moved to a tropical forest. So basically it meant that I would have to design another model from scratch and would have to redo the concept art.

This time I had to pick another animal to model but I wanted it to attack the player like last time, so in the game we would have more than humanoid enemies. I chose do make a komodo dragon, because it has a bite that kills over time so the damage would be like a debuff (a temporary negative effect that lasts for some time) that drains health.

Currently the game sound similar to Farcry with a sci-fi twist, but you can't just 'reinvent the wheel'. I'm having to also think about whether the Komodo dragons would be affected by the virus that is spreading via mosquitoes. The virus currently doesn't have a name and this is because we thought we should do some research on how they categories and name viruses.

Concept art for Wolf

We had a meeting to decide what each of us will be working on and I picked chose to make the animals that would attack the players.

Since the environment would be a forest I decided to make concept art for wolves, I first did research for the anatomy of the wolf, below you can see how i looked at different aspects and parts of the wolf; i did this because when it comes to modelling, things will be easier, I will have a better understanding of what it is I'm trying to make.


I also started developing the wolf because in the game there is an infection and radiation that's spreading across the world and so the animals and other creatures are mutated.

Thursday, 6 February 2014

Making of the poison bottle

I first started Autodesk Maya 2013 and made a poly cylinder, then I increased the sub divisions of the cylinder and started to extrude the top of the model, also I used the cut face tool when I needed to.

Once I had a form that looked like a bottle I selected all the faces and extruded once more to add thickness to the bottle. Then I went to hypershade and used "mia material" on the bottle, I increased the refraction and messed around with the settings until I got something that looked like a glass texture. Then I goggled a poison label; I would have made my own label but I didn't have much time so I decided to use some stock labels.

Then I started setting up a lighting scene, I created 3 planes, one was used for the floor and the rest were used as walls. I wanted soft shadows and a HDRI to light the scene, So I went to the render settings and enabled ray tracing shadows, final gather, global illumination this was so the render would look realistic.
I didn't really know how to make liquid in maya so I looked around for tutorials but all the tutorials either took too long or didn't really used liquid, it was more of "shaping polygons into the shape of a liquid", I did find something called "Glu3d" for maya which created liquid using GPU render but I was unable to getting it working on maya 2013.

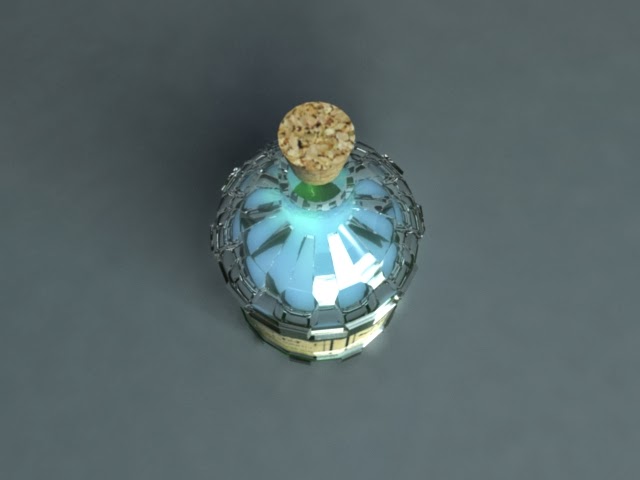
So instead I just made another cylinder inside the bottle and then I made a similar texture to the bottle but made it more liquid like and placed that texture onto the cylinder inside the bottle. Then I made a cork for the bottle, and I just used stock textures for the cork as well and then I was done.

Here is the final result.