The method of modelling I use is called box modelling, I'll make another post explaining what box modelling is.
- Multiple saves
When modelling it's easy to mess up and either ruin the model or just lose it, so it's recommended that you have multiple saves, not only does it allow you to revert back at any time, it also lets you see your progress, I have around 20 saves for this model, I remembered to make a new save every time I made a major change.
- Reference images
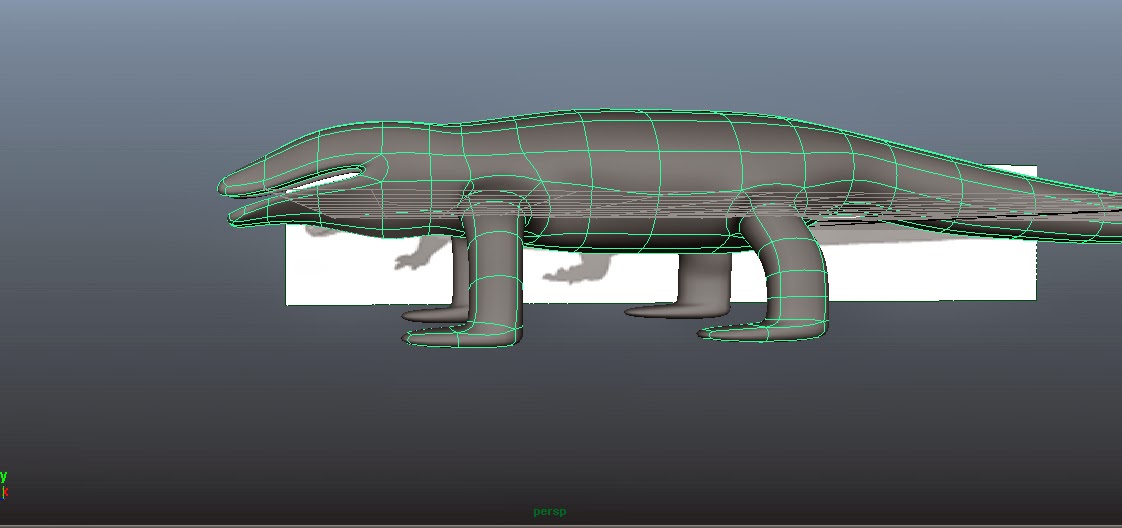
I kept the reference images opened in photoshop, so I could zoom and view detail that exists in real life and then try to replicate that to the model. Since I'm box modelling I have a side view of the komodo dragon on the side view port and komodo dragon facing towards the camera, on the front view. this is usually more than enough but I have another image on the top view port which when viewed in the prospective view, is below the model.
- Custom tool bar
I added shortcuts to the custom tab so I wouldn't have to keep clicking the 'edit mesh' and then click what you will use over and over
- Clean model
I made sure to keep the model clean and low poly to begin with because it's easier to model when you don't have to transform and edit a lot of polygons. From my previous project which was about making a tower in Autodesk maya, I learnt that I should work with quads and should try to keep the typology neat and tidy to avoid in faces and errors at bay.
- Special mirror/ copy on model
I only modelled one side because within the time I'm given I wanted to make sure I get a decent model done, by modelling half of the model I can mirror the geometry later. After I created the cylinder I selected on half of the cylinder and deleted it then I went and clicked on duplicate special, I then double clicked the move tool and enabled soft selection and reflection; I had to mess with the parameters to get the settings I want but in the end I did all this so I only have to model one half of the model but I can see what the final result will look like because whatever I do on one side gets copied to the other side. I enabled soft selection because it's like photoshop brush hardness, and this moves more polygons; soft selection allows for a natural look without having to move a lot of the polygon individually


Above you can see most of the shortcuts that I plan to use on this model, first icon is extrude, which is essential and I think I've used it the most. Second icon is to connect/merge vertices's. Third icon is for creating faces or 'bridges'. Forth icon is probably to merge edges or something to do with edges. Final icon is for 'insert edge loop tool, it allows you add a loop that goes around and basically can be done on most faces.


 I held right click on the model to get the options menu and then clicked on edge, then I when and double clicked onto he back of the cylinder, double clicking allows you to select the whole edge in this case it selected the whole circle at the edge then I clicked on my shortcut; extrude. Then I clicked on the key 'w' which is a shortcut for the move tool and just dragged a bit and positioned it where it needed to go and then I clicked on extrude again and I moved it again and again, scaling the loop that was highlighted in order to form the slim bit at the edge.


 (This part is harder to explain without actually showing you what I'm doing). After that I made the mouth; I wanted to give it more depth so I selected the rim with the edge tool and again used extrude. and I typed '0' in the 'X' position at the top near options for polygons and such, this meant that I wouldn't have to manually move the extruded part myself and it wouldn't overlap the other side. After doing that I when in the vertex mode and used 'merge vertex tool' to connect the faces together. The result is perfect for what this model will do in-game.
Finally I deleted the left side of the model because it is now time to connect the geometry, I then clicked on mirror geometry under the mesh option, then I selected '-x' bexause that's where I want it to be mirrored and I made sure that merge vertices was selected and merge with orignal. This conncect the geometry and I was now going to make some finally tweaks.
No comments:
Post a Comment